

The Big Kitchen Renovation (Part 2/2)
- Hello Ember

- Feb 24, 2021
- 12 min read
We bought a house with the intention of renovating the entire first floor. After some thought, budget crunching, and asking around we had decided to go with an all-in-one company to get the job done. However, that company wasn't exactly forthright with the cost estimate until a few months and a lot of waiting went by...
After a few back and forth discussions to try and drive the price down to our budget (and the range they originally told us they could do it for) we decided it was best to cut ties with this company rather than get in over our head financially, or continuing to chop up our kitchen design hopes to make it work.
STEP 8: Starting Over (AKA Calling Contractors & Research)
After sufficiently panicking about not knowing where to begin on chaos this size, I started to call any contractor I could to get pricing and availability and find out how much they could do. Luckily, part of the "design process" with the prior company meant that we'd have actual somewhat-formal papers with measurements to show other contractors.
I don't totally know the proper process, but to me it made sense to start with the windows, then do HVAC/Plumbing/Electrical, and then drywall. (and then the finishings like flooring, cabinets, etc.)
STEP 9: Helpful Advice
Another person I reached out to was a family friend, Dave. Dave is basically a secondary father/father-in-law to us and he had been a contractor for years. Talking with him meant we'd have information from someone that wasn't trying to up-sell us on anything and truly had our best interests at heart. We needed some advice on where to go next - I mean we had just about gutted this floor before we cut things off with the company.
Dave's words were so helpful.
He talked through the different things we'd need for framing, HVAC, Electrical, Plumbing, etc. and he gave us the order of operations on how to proceed, especially if we'd be piecing it out to multiple contractors:
Get the window that needs to be smaller replaced. Simple enough, but crucial to get done a) before the weather gets too chilly and b) before anything else gets done because the other pieces will need to be done after that.
Plumbing. We needed to get some plumbing relocated for the fridge, dishwasher, and sink. Plumbing needs to go first before the electrical and HVAC.
Electrical The whole space needs to be rewired, adding in new lights, moving the oven outlet, the whole deal. Dave talked through all of this with us and where it would make sense to put light switches, etc. We also talked about the thermostat moving and how it would make sense in that size of a room that's open to put a ceiling fan to help with air circulation.
HVAC There are 4 spots that will need to be rerouted. 3 of them can be moved into the toe kick of the cabinets, and the other one could likely be sealed off because of it's location and lack of function.
Drywall & Subfloor repairs This would come after the previous stages because those contractors will likely need to cut into those and adjust as needed.
Cabinets/Flooring Cabinets need to go in first if we are doing vinyl or laminate and vice versa if it's wood flooring, so we'll need to figure out what style of floors we're going to go with prior to this point.
Counters/backsplash - This will obviously need to go in after the cabinets and flooring
Install Appliances - Again, this one is pretty obvious
STEP 10: Assembling Contractors
(Steps 10 & 11 were happening simultaneously)
Then it came time to getting estimates on timing, pricing, etc. I didn't hear back from everyone I reached out to, but the first contractor we wanted to hear from us responded and was available to stop by pretty quickly.
For the sake of this post, I'm going to change his name to "Peter"
Peter was the contractor that did our downstairs hallway and the bathroom, so we know he's responsive, quick, and budget-friendly. He also has a large team that he works with. He said he'd be able to start as early as the weekend which was fantastic, but slightly sooner than we'd be ready for him (still need to move our old kitchen appliances and remove a cabinet) He said he'd be able to have the whole team (minus an electrician) for the task which was fantastic.
I also called the electrician we hired for a few earlier projects and will get his schedule to give us an estimate within the same week, however he wasn't available for a few weeks, so I called a different electrician.
STEP 11: Material and Appliance Purchasing
As all of this is happening the same week as Thanksgiving- sales are everywhere. I bought a fridge (for the purposes of knowing what size for cabinets to plan for and order) the previous week, but clicked on the link again to find that it was $500 cheaper than a week ago when I bought it. SO, I cancelled that order, and reordered it, along with the other appliances we'd need (range hood, drawer microwave, dishwasher, oven) and got them for a heck of a deal. - About HALF of what the appliance store employee told me I'd be able to get them all for.
However, due to COVID and other factors, the earliest available delivery for all of these items is March 24. This would normally be a bummer, but as we have a lot of work ahead of us, and the holidays between us, that's alright.
I also started buying the bits and pieces we'd need to finish out the project, like pendant lights, recessed lights, a light over the dining table, kitchen basin, kitchen faucet, garbage disposal, cabinet pulls, etc.
STEP 12: Technical Nitty Gritty
We learned what it's like to work from home, during a pandemic, during a home renovation. Home all the time. You get to really cherish all the clangs and bangs. :) Best part though, I wasn't even annoyed- the noises meant progress was happening and I am A-OK with that. The dogs were a little nervous, and it sucked that they were limited to a couple rooms, but all part of the process.
This is where it's out of our hands and a matter of time. We couldn't do much during this part except wait on the electrician, plumber, and other contractors to bring it all together. If you're curious about the order in which things went in, it went like this:
• They finished the demo
• Installed plumbing
• Updated HVAC locations
• Replaced Subfloor
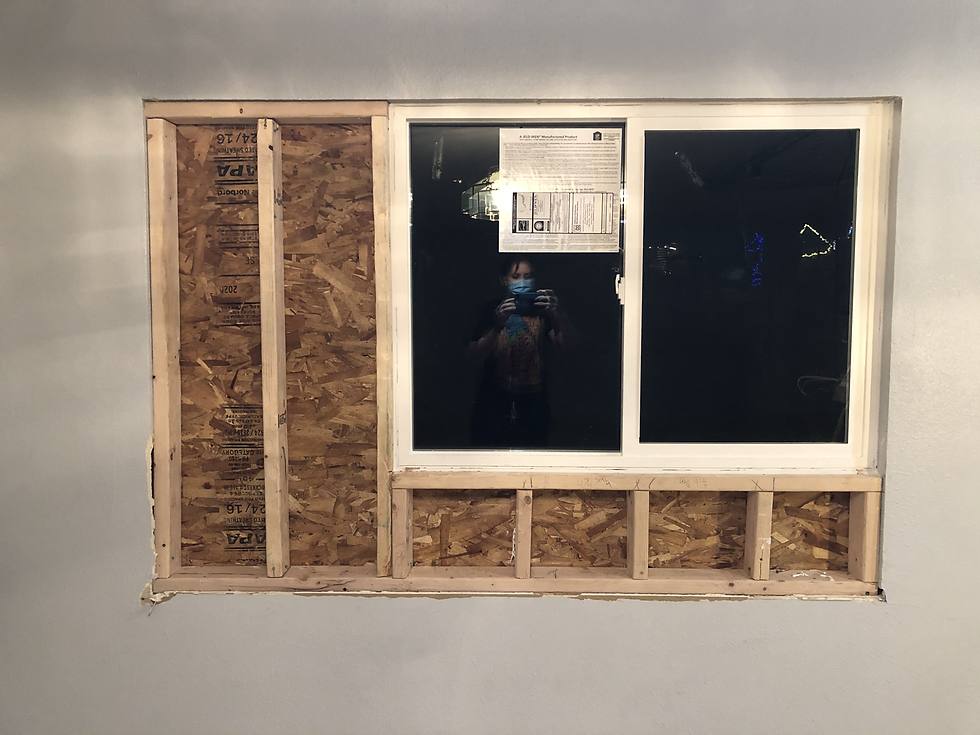
• Replaced a large window with a smaller one to accommodate for counters/cabinets
(that was all the first three days, photos below of before the electrician came)

Then it was a matter of waiting for the electrician, we had one scheduled but the timing wasn't ideal, but our contractor had one- it took him about 4 days to rewire and install all the appropriate updates. This was a super beneficial process for me to help with, as I helped measure out where the cabinets were so he knew where to wire things.
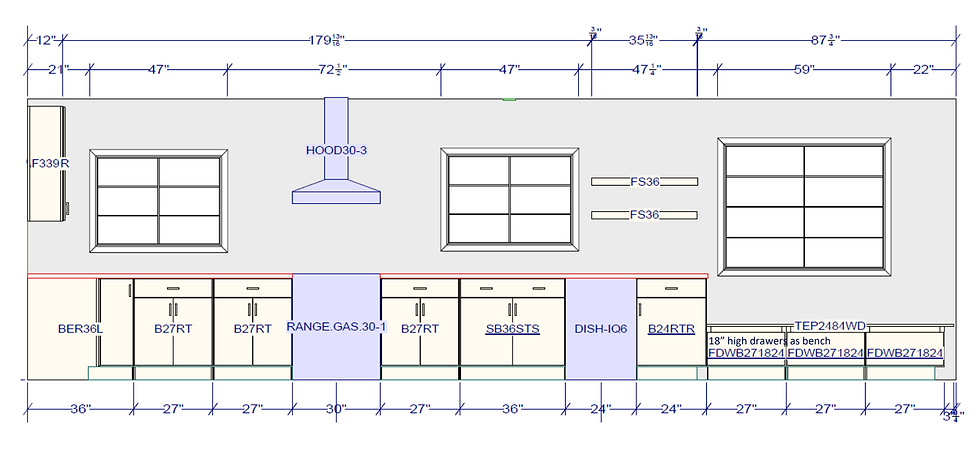
We caught a potential issue ahead of time, and a big one. The original plan had the window that needed to be replaced moved further to the left. (photos below) We caught this while measuring things out, which was helpful because the oven needed to be centered between the two. If we'd continued with the original plan, the stove would have been about 12 inches too far to the left and look extremely out of place. Also, in the original plan- every time you open the wall cabinet, it would have obstructed the window, which to most people wouldn't matter, BUT it would have bugged me a lot.
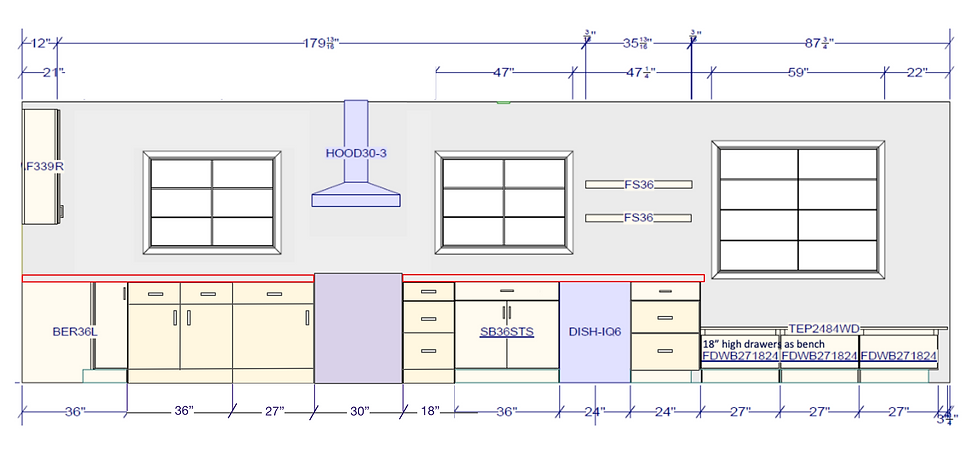
Luckily we hadn't ordered cabinets yet and it was a matter of reconfiguring the cabinets properly to adjust. We triple and quadruple checked this by measuring in the actual space and marking them on the walls and floors.
Original plan for that wall:
Updated plan for that wall:
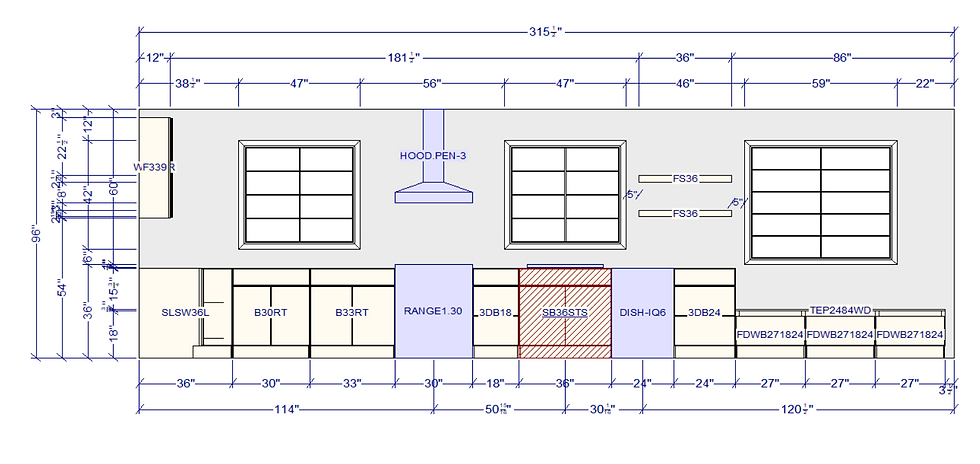
Final plan for that wall:
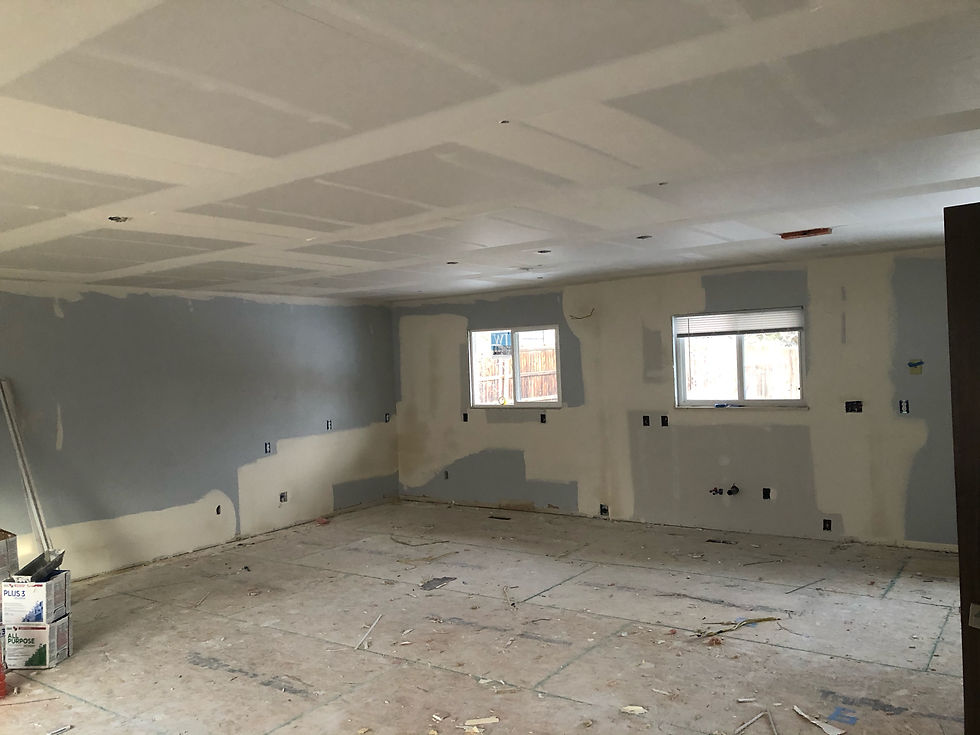
STEP 13: Drywall, Texture, and Paint
Then it was time for drywall. They put a brand new layer all the way across the old existing ceiling, and then would texture and paint.
(below is after day one of drywall, before texturing and painting)

(here's one after the texturing:)

The contractor ended up having to come back and repair a couple cracks in the drywall seams so it put us back a few days, which was fine since the cabinets would take awhile to ship to us.
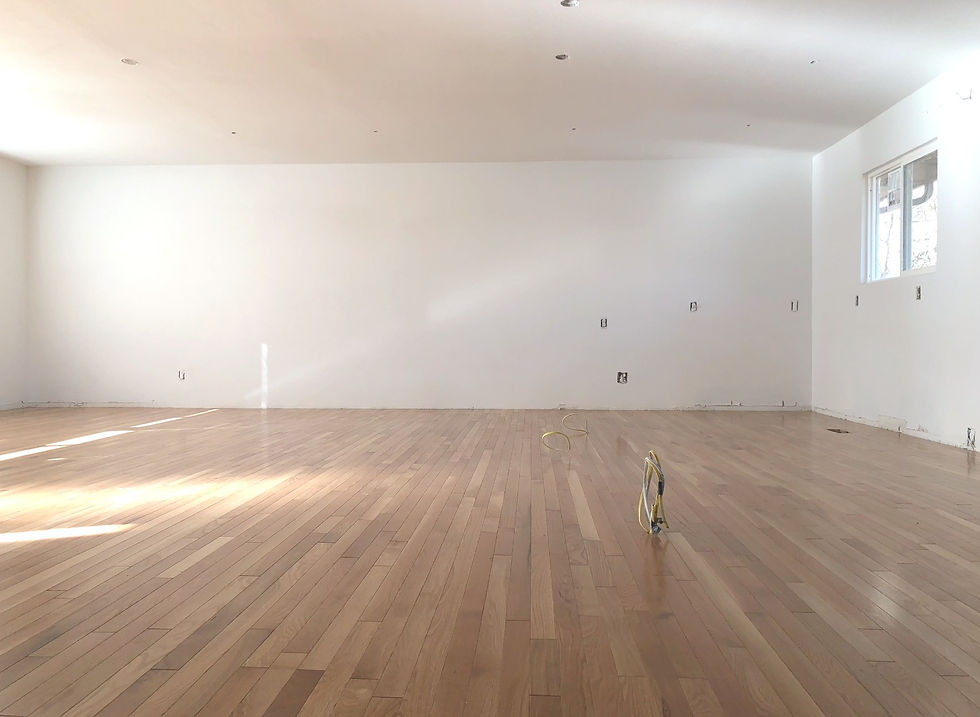
Once the walls and ceiling were done, it was time to paint them. I hate painting ceilings so the crew did that. I don't mind doing walls, so I handled that part.
STEP 14: Flooring
Next, time to put flooring down. We went with a hardwood option, so the floor is okay to go all the way throughout. (If you get a different type of flooring, you'll want to put cabinets in first, and then flooring, but hardwood should go all the way under. AND since there's a long wait between when cabinets show up it made sense to do that way)
The contractors ended up doing the floors while we were away for Christmas- so it was like a nice little post-Christmas reveal.
Once this step was done, it really started to feel like things were happening, and finally on the back end of this massive renovation.
STEP 14: Cabinets
After thorough research, and exploring several options both locally, and online.
Cabinets are expensive.
We went back and forth quite a bit about if we should order full assembled, already painted cabinets that would take less time to show up, (6 weeks) BUT would be more expensive. OR if we'd buy assemble yourself unfinished cabinets that would take longer, (10-12 weeks) but ultimately save a chunk of change.
We were also considering buying just the cabinets that require the slabs for the first order, and then getting the bench pieces and the around the fridge pieces later to split the expenses into two.
We ended up going the preassembled, faster, more pricy option. The cost difference wasn't big enough to justify going with the second option, although it was tempting. We ordered these around the time they were doing the drywall, and that meant there'd be a waiting gap in between the flooring etc. and when the cabinets showed up. However, this was totally fine since the appliances would be 3ish months yet. We've waited this long, a little longer won't hurt as long as there's still progress...
It felt like forever, but hot damn was it worth it.
I can't even begin to put into words how excited I was when the truck backed into our driveway. We waited months for this moment.
The colors were so good! Especially next to the floor.
I did end up ordering different hardware once I saw them. I had originally ordered some classic rectangular ones that would be mounted to the front of them. However, after seeing how much I loved the slab fronts, I ordered some different ones that would be under-mounted to the backside of the cabinets.

STEP 15: Installing Everything
Since the cabinets were pre-assembled, and pre-painted, they were ready to install upon arrival. It took a few days, but holy crabapple it was nice to see them being put in. It's like what was floating around in my imagination was finally coming to reality. You could actually walk through the space (which I did, quite a bit during this phase, imagining where things would go, how cooking in there would be, etc.)
We were slightly off on a measurement for the island, which wasn't a huge deal - we just needed to move some wiring. This snag was causing me some anxiety and questioning the whole design. What if this didn't live up to our expectations? What if once it's done it didn't look good? and so on...
The electrician installed the light fixtures. Most of which were recessed-looking, but we did get pendants for over the island, and a more decorative piece for above the eventual dining table. Having lights CHANGED EVERYTHING It was so bright and felt so polished - no more holes in the ceiling!

The next big thing to be installed were the countertops, and because the sink is an under mount sink, that got installed at the same time (but not hooked up to water just yet) The sink I picked out was massive, so they ended up having to trim down the cabinet inside slightly, but it worked out fine.

Andrew also stained and finished some butcher block for the bench area. This was relatively easy- just trimming to size and then applying multiple coats for coverage.
Then a painter needed to repaint the ceiling- there were some odd spots that didn't get the texture right etc. so that happened the day after counters were installed. It definitely wasn't ideal for the order of everything, but it worked out fine- they covered the cabinets and everything and although it's just a white ceiling, it was the last major (space-wise) thing to be done :D
Next, the plumber came to hook up the sink, dishwasher, and garbage disposal. This was a HUGE step because we've had to use the utility sink for larger stuff, and it is... gross. I've never set a dish down in it, and have been hand washing things one at a time so nothing touches the sink itself, here's a photo to give you the full effect:

STEP 16: Appliances
The appliances weren't scheduled to show up until March 24. We ordered them during Black Friday sales, but unfortunately, longer shipping times were inevitable due to COVD-19.
This wasn't a huge deal since January was just a lot of waiting for the cabinets, and February was installing time anyway. Again, we waited this long, we could wait a little longer...
Just for the sake of curiosity, I visited Lowe's site and checked on my order the first week of February, and luckily it said everything was ready so I moved up the delivery date! We were able to finish it all a month and a half earlier because of that and I'm SO happy I checked on that. They did show up on the same day that the painter was finishing the ceilings, so they ended up storing them in the garage and then coming back later to officially put the oven in. Trying to time things out properly is... tricky...
When they were unwrapping the refrigerator, they noticed a large dent front and center on it, so they brought that back with them. Unfortunately, they also took the old one so we were temporarily left to use a mini-fridge and coolers in the backyard :) Luckily, it was a cold weekend. After calling them to find out more, they said they might be able to get a replacement to us soon...
The replacement fridge showed up 2 days later, however, as they were leaving and after Drew signed for it, I noticed it wasn't the model of fridge we bought. It was also about an inch/2inches taller than the cabinet opening would allow. I called Lowe's and they said to use that fridge for the time-being and they'd get me a new one in a week or so. Drew's going to chat with the contractor to get the cabinet adjusted properly.
They also needed to customize the hole opening for the microwave cabinet to get that to fit properly.
Our contractor's team ended up installing the dishwasher, range hood, and the microwave.
STEP 17: Trim & Finishing Touches
The contractor's team put the baseboards in place. However, they didn't caulk or paint them, so Drew ended up doing that part of it. That wasn't a big deal since he's done SO MANY baseboards at this point.
When it came time to adding cabinet handles, I went around with little sticky note tabs to mark where we'd need the handles installed. There were a few spots that I didn't think we'd need them, like under the bench area- it would likely scrape on legs sitting at the bench... Then on the wall cabinets, those are a wood tone and didn't look as good with the stainless steel handles, and since they're easy enough to open without handles, I decided we'd leave them off of there. Once the handles were installed, that's when it finally felt like a functioning kitchen for me. Being able to easily open a drawer doesn't seem like a big deal until you're struggling to get to a hot pad while food is over cooking :)

STEP 18: The RIGHT fridge, and Fitting The Cabinet
The correct fridge is on its way to be delivered (a few days later) and the final step is for the cabinet contractor to fit it properly into the space.
While it's not ideal that we're still waiting on this step, it happens with renovations. Getting upset doesn't do anyone any good. It will get resolved, and for now, we have a functional kitchen, so waiting isn't as big of a deal.
We are SO CLOSE to having it done, another few days won't hurt.
Overall, I was really upset once we had to cancel with the all-in-one company because it meant a lot more work for me, as well as being in way over my head to coordinate everything as needed.
However, I didn't realize how much more I'd feel in control once we switched processes. Instead of waiting on a company, and not knowing what's going on, I was able to know where everything was, and could appropriately nudge where needed. And I felt more comfortable asking questions and being more involved with quality control.
Also, I feel like paying for someone else's "design" was a waste of money since all they really did was put everything I had given them in a different document, and didn't appropriately think about how it would be laid out in the space. AND we got the same "service" every time we reached out to a company for cabinet quotes.
Also, we saved a big chunk of money by doing so.
AND we moved a lot faster.
I will post a Kitchen Reveal soon, (once the fridge situation is finished) but definitely wanted to give the process phase its proper write-up because it was a beast of a process.


Comments