

The BIG Kitchen Renovation (Part 1/2)
- Hello Ember

- Feb 16, 2021
- 7 min read
We are SO CLOSE to having our kitchen fully done, so I'm going to start by sharing the process. It's been a beast of a project. We started tearing out the kitchen almost immediately after moving in, which was early August 2020. I am now writing this intro and posting this in mid February of 2021. That's right, this has been a full 7 month process at this point. There's been a lot of waiting, and hang ups, and learnings. But we are SO CLOSE to the finish line now, at least close enough that I feel comfortable posting the process :)
Overall, I'm happy with it, but more than anything, feeling burnt out from it. I mean, what makes a global pandemic more stressful? How about move and then immediately start a massive kitchen renovation...
When we were searching for a new house, we knew we wanted a house that we could customize the kitchen the way we liked it. There were plenty of options that had beautifully remodeled kitchens, but none of them felt like us. It felt like a waste to take a perfectly fine kitchen and tear out pieces we didn't like, so we were on the hunt for a real gut-job. (This also helped us in a competitive house market, because not a lot of other people are willing to take on a big project right away)
Now we had done updates to both of our previous home kitchens, and you can read about those here (townhome) and here (old house). However, we knew this would be the biggest update of them all and since we plan on living in this house for a LONG time, this one had to be fantastic.
The house we picked (and got) had an extremely outdated kitchen. I don't think anyone updated the cabinets or backsplash since the house was built in 1971. The previous owner rented it out for the last 25 years, and any "updates" were slapping vinyl peel-and-stick floor tiles down and thin wood-looking veneer on top of the aged cabinets. The kitchen was also cramped and the appliances were dated. (maybe in the 90's on these)
What to do?
We like to entertain (when we're not living in a pandemic) so we wanted to open up the space and knock some walls down. I don't know about you, but when we host, people naturally gravitate towards the kitchen, regardless of how many other spaces there are- the kitchen is always the heart of the party.
We didn't need a formal dining room, so we thought of how we could incorporate a dining space that made sense without being closed off. Also, having the living space be separate doesn't make sense for our future family aspirations.
Fortunately when looking at this house, we noticed there were a few others of the same floor plan that had opened the space as well. This was a good sign because the walls likely weren't structural. Although this needed to be confirmed by a structural engineer, it seemed promising...
Before:
Here are a few "before" photos of the whole space:
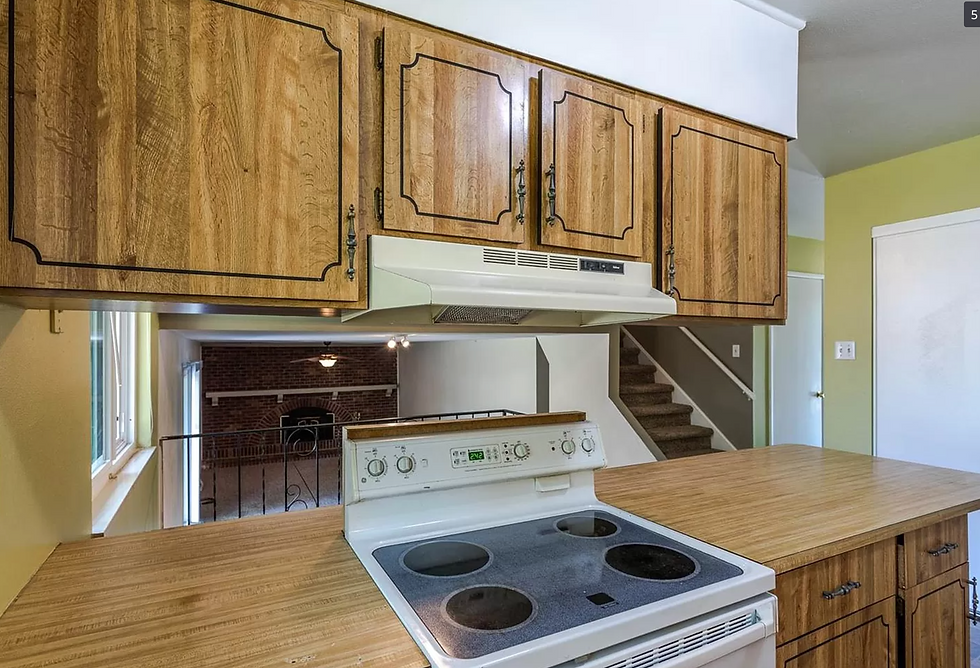


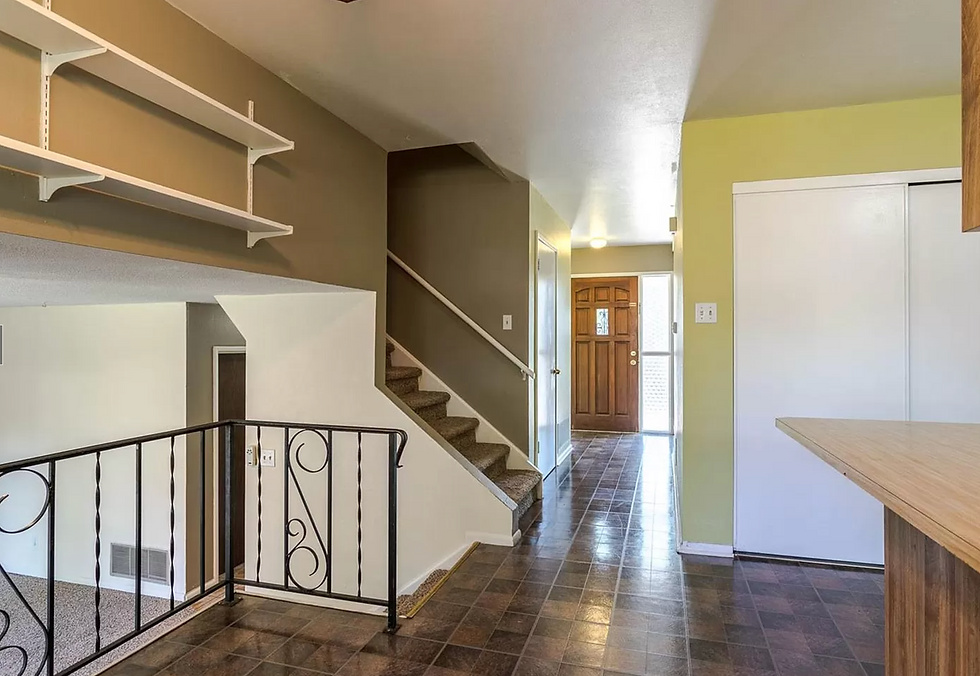
I mean, why would anyone want to get rid of such beautiful lime green walls and cheap peel and stick flooring? And original cheap 1970's cabinets? What a gem! ;)
Anyway, here are the steps we took with the renovation:
STEP 1: Inspiration & General Plan
We went through a ton of inspiration before calling around for quotes. This is an important step because it helped us know exactly what we want, and helped contractors have a better idea before committing to it either way. It's a large project and it's better to have the ideas pinpointed before getting a team assembled because:
It helps to know what materials needed to be sourced. We have a specific style in mind, including slab front blue cabinets. This is not a standard cabinet style or color, so deciding that early helps weed out the businesses and contractors that don't have those materials.
It saves everyone time in the planning process. You're paying people for their time and resources. If you can be decisive early, it helps them as much as it helps you. Even if it's as simple as the colors you like, it helps a lot.
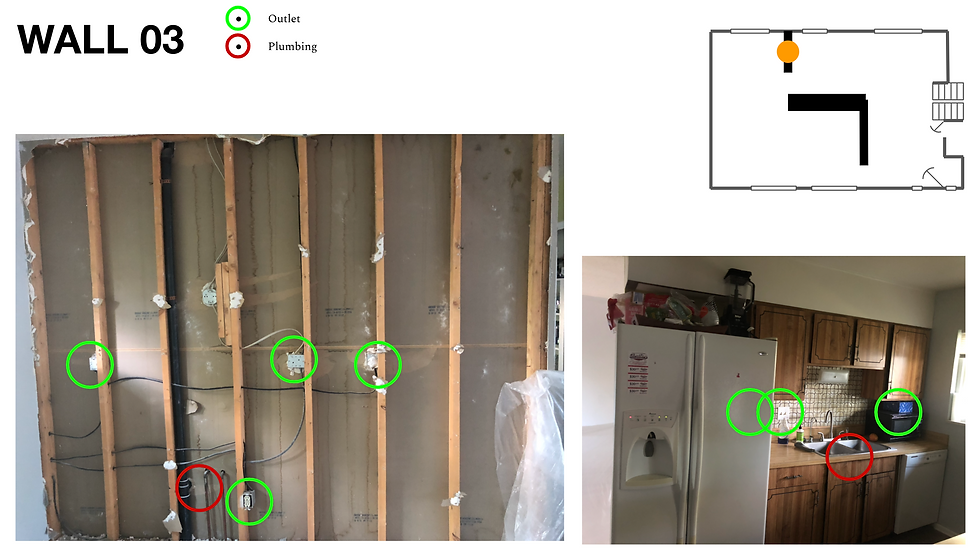
Now, I tend to over plan things, so I put together an entire presentation deck to send to contractors to help communicate the size of the project, and the work we were looking for.
Here's a few examples of the pages from that presentation deck:


STEP 2: Getting Quotes
This part of the process was my personal least favorite. Some of the contractors I spoke to were downright condescending. Maybe this was because they knew people needed them- they felt confident in being jerks, but I definitely don't want to work with someone that's a jerk for a project this big, especially one that's in my home. These were easy companies/contractors to rule out.
There were different ranges of companies- some that just did design, some that just did the build, and a couple hybrid teams as well. The price ranges varied quite a bit, but the ones that were on the high end had some items clearly marked up. The ones on the low end were light in the services offered, and would mean more work and coordinating on our end.
STEP 3: Picking a Company/Contractor
We narrowed it to down quite a bit after getting the quotes. We decided, based on the size of the project, that we definitely wanted to go with a company that would do the project management, and sourcing, etc. on their end over a lot of contractors. This would be more expensive, but a lot less work for us and would be a faster timeline.
STEP 4: Structural Engineer
Since we knew we wanted to rip walls out, we needed a structural engineer to come and confirm that the walls were not load bearing. I asked the company we decided on if they had a recommendation for a structural engineer. Fortunately, they did. He was super friendly, and relatively inexpensive. He came and did an inspection that confirmed the walls were safe to come down, and then gave us a certification paper that he came out and confirmed that those walls were okay to be removed.
STEP 5: Beginning the Demo
We did this part in overlap with some of the previous steps because we knew this needed to happen regardless, and we had the time to do it ourselves. The biggest part of the space, we didn't use anyway, so why not rip it up and block it off? We stuck to the "safe" things to rip out- cabinets, carpet, drywall, trim work, etc. I didn't want to try and move plumbing or electrical.
Unfortunately we ran into one snag during this part of the process when the waterline to the fridge got cut and soaked the floor below (drywall in the basement ceiling) and caused a couple hundred dollar fix... However, we've seen enough HGTV shows to know this was bound to happen at some point so we weren't too upset when it happened.
I took a lot of photos from this phase, but here's a couple from one section:


STEP 6: The Design Phase (with contractor)
This had been postponed a few times due to a few conflicts on both ends, but once we were able to get in for the appointment it went relatively quickly because we had so much narrowed down in the inspiration phase.
This meeting was a lot of picking the finishings and deciding on the layout and what cabinets went where.
Even though we knew what we were looking for- this meeting was exhausting because of the back to back decisions to make: light styles and placements, cabinet styles and types, flooring, trim, paint colors, sink, faucet, hardware, etc.
Then came a lot of waiting... weeks of waiting for the company to put together the pricing quote based on the scope of the project and materials chosen.
Here's a photo of the things we picked in this meeting:
(the handles we picked are in the bottom right corner of that board)

And here's the rendering from the designer using those choices:

STEP 7: Adjustments to The Design Phase
Yes, this gets its own section.
The first round of this, we got the pricing back and it came in about 20k over the top end of our budget. This was EXTREMELY frustrating given that we were told that we could make this design work within our budget, and we'd been very upfront about the layout, finishes, etc. that we wanted from day one (see overly designed presentation mention in Step One)
"Why is this frustrating? You picked the finishings..." You might wonder...
Well, here's the thing, as a designer it is your job to find things to work within your client's budget. It's up to you to provide material options within your client's budget. We didn't need the design meeting to know what we wanted it to look like as a final product, or even what we wanted the layout to be. (again, see overly designed presentation mention in Step One)
We ended up going back and forth with the company to find more cost savings. We swapped out the cabinets for not-so-top of the cabinets and that saved us about 10k in that alone. (why the designer was pushing the top of the line cabinets while knowing our budget is beyond me) And then we swapped out the flooring, the countertops, and decreased a few lights.
Then we got that price back, and it's still 5k over the top end of our budget. Also given that the design process itself is 2k and was supposed to be factored into the overall budget, then we're about 7k over even with all those changes. The budget was important to us because we wanted to pay in actual money, not credit. We brought up a couple other cost savings we thought would work, and the contractor had reasons why those wouldn't work.
So it was time to make a hard decision.
Could we force this over-the-top budget to work? OR was it time to sever ties with the all-in-one company and venture into the world of piecing together contractors?
We cut ties with that company.
Was I crushed? Yep.
I had a little bit of a meltdown about how much time we had wasted waiting on that company, and the fact that we had already invested money in the waste-of-time design phase with them.
Especially crushing, given that we cut ties the Friday before Thanksgiving week, meaning other contractors were likely unable to work multiple upcoming weeks due to holidays. (also Coronavirus was in a high wave, so that complicates schedules and shipping availability as well)
I was frustrated that they had said a certain price point would work, when in fact, they underestimated the project despite aggressively tedious information upfront.
I was annoyed that we had a halfway demolished kitchen and living room in our house. That's 1/4th of the space in our new house that's torn up with absolutely no plan on how to fix it...
I've decided to split this post into two, as this process is incredibly long and this first phase was so different from the second phase (that I'm currently in)


Comments