

Main Bedroom Closet Makeover
- Hello Ember

- Feb 3, 2021
- 7 min read
Updated: May 25, 2021
I love organization, and I love a good closet. So, when we moved into our house I wanted to design out each of the closets to work well too. To say a good Main Bedroom Closet has been a life goal of mine, would be an understatement. I LOVE a good closet, so I was determined to make this work.
This house has no shortage of closets with 4 large closets for each of the bedrooms, and 3 good-sized closets in the "non-conforming" rooms, and 1 coat closet.
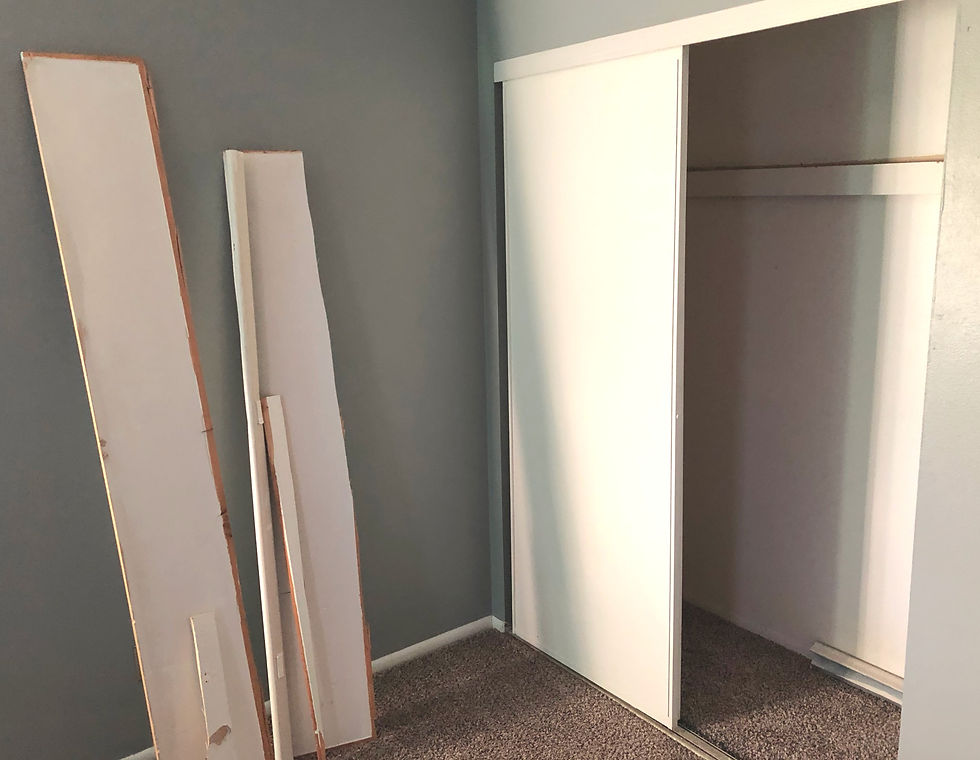
The 4 bedrooms and coat closet had, what I'm assuming is, original closet systems to 1971. They each contained one long shelf on top of one long "rod" However, they're not standard closet rods. These contained a hook-type-rod that you put the hangers in backwards. I'm guessing the original intention of this was to be more decorative and hide the hangers better, but it's just bad design.
I tried to make this thing work for us, I really did, But after about two weeks of getting frustrated every time I went to grab a shirt, I put all our clothes in a guest bedroom and started ripping that thing out.
Here's a video of the hook-type-rod that I'm talking about:
Phase One: Demolition
There were large sliding plywood doors that were ripped out first. Primarily because we had a dumpster at the time, and those things were huge.
Then the giant shelf and "rod" combo needed to come out- this proved to be a little tricky because it was pretty sturdy. Eventually it came out alright.
Also, I found a hidden Camel cigarette in the "rod" thing and that grossed me out quite a bit- because what else is hiding in these things? How long had that been there?
Next, I took out the track system above and below the doorways. The tops came out no problem. The bases took a little more time since the screws were stuck on the carpet. When I pulled those out, I found GREEN SHAG CARPET. That's right, the previous owners decided to leave the tracks in place when they upgraded carpets, and they left a strip of the original. More incentive to update the other closets...

Speaking of floors, we eventually want to put hardwood throughout the upstairs, however, given the cost (and again, the other million projects we started) we'll need to just do an update of the carpet for a couple years, and then replace the floors to be hardwood in 3-5 years. BUT since I was planning on attaching shelves in the space, I didn't want to do that on a nasty carpet that needs to be ripped up anyway... Instead, we decided an oak-looking laminate would work in there for now, so I took out the baseboards and the old carpet.
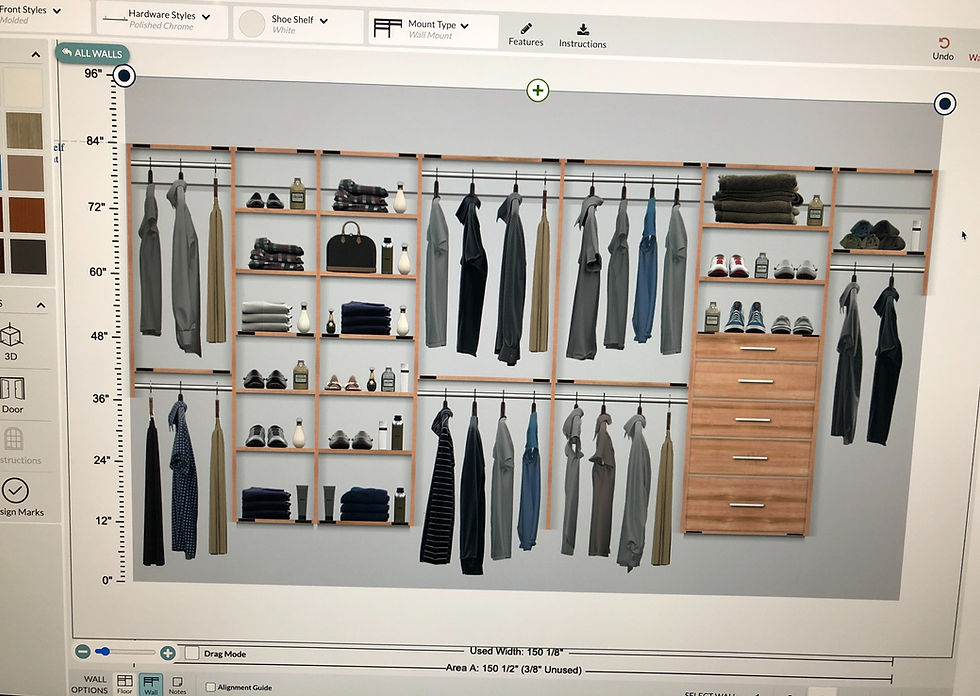
Phase Two: Design
I researched a couple options for the closet shelving. Ultimately, I'd like to build it myself, but I'm no where near that skill level yet, so I'm not going to drag this out for longer. Especially because it's our closet, and not a guest room.
The first type of closet systems I looked into were the ones where you go online, enter your dimensions, add what you'd like, and they ship you the parts to install yourself. I have used one of these systems in the past- for my side of the closet in our townhome. (I intended to do the other side too, but we ended up moving) I was really happy with this system (for the life of me, I cannot remember what brand I used) But when I put in the dimensions for our current main bedroom closet, the price was around 2k for just the shelving units... I couldn't stomach that price for a closet right now since we're trying to do so many other projects too.
Then I looked into what Lowe's or Home Depot offer for closet systems. However, those seemed a little expensive for what you get, and it was a bit of a hodgepodge for a final result.
Next, I looked into the IKEA closet systems. Their online design software was annoying me, and after spending about 30 minutes in there, I decided to try a combination of things instead.
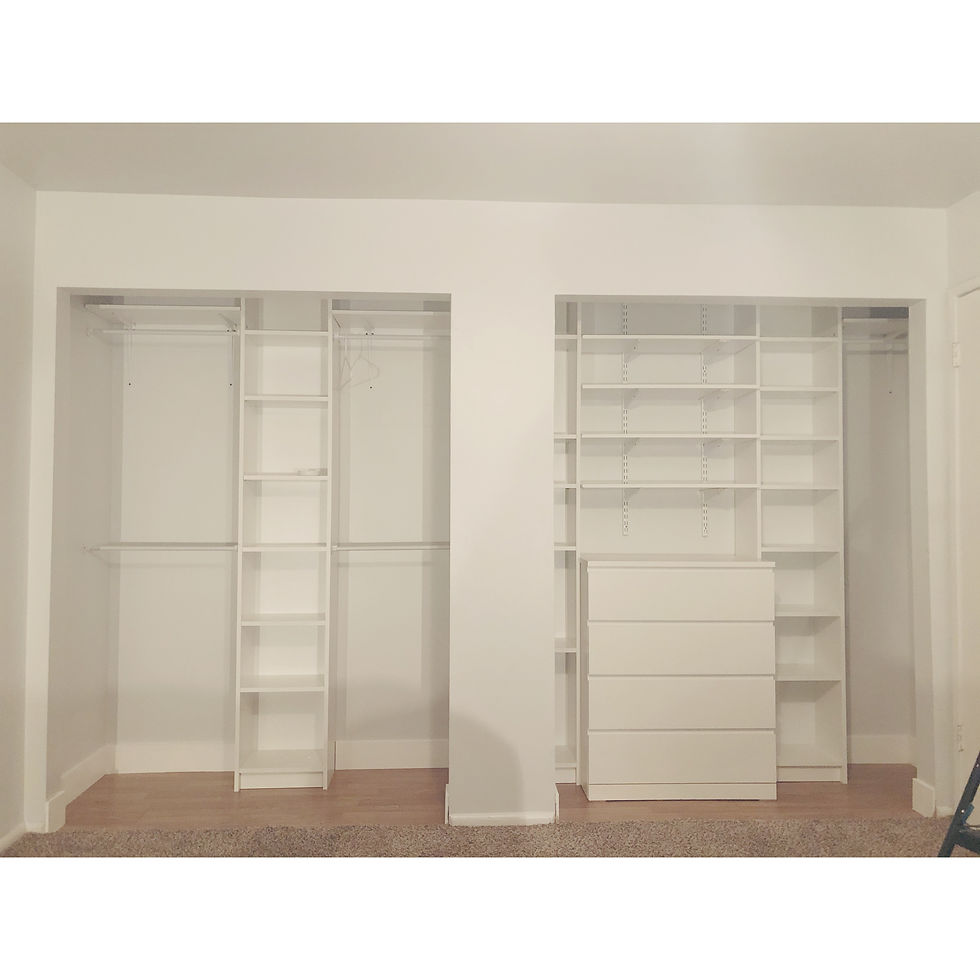
For the design, I ended up buying an IKEA dresser, and 3 tall skinny Billy shelves. I'd like to get one more smaller shelving unit to put on top of where the dresser is going, but that item is in-store pick-up only, and some of the other items were delivery only, so I just got the delivery items to start.
Phase Three: Painting
I gave the space a fresh coat of grey paint to match the other walls of our bedroom. However, after realizing how much natural light that space gets, the grey was too dark, dingy, and gloomy for the room. (and I love grey walls, so this was a strange realization)
So, for the first time in my personal history as a homeowner, I painted walls white. I needed to paint the ceiling of our bedroom too, so I just used this white tint err'ywhere in that room.
The actual painting was a bit tricky since I had already assembled the IKEA shelves, and didn't take out the bedroom furniture. This is NOT recommended, as I had to do a lot of shuffling, and it took about three broken up days of painting.
This was also the first time I'd used Sherwin Williams paint. I generally use Behr, but I had to go to Lowe's anyway, and contractors always say Sherwin Williams is better, so why not give it a go?
Not a fan.
It took me about three coats to get good coverage, where usually with Behr it takes me about 1.5-2.
Phase Four: Flooring
The flooring only took about 4 hours to do. It's not a large space, and the step-by-step is pretty simple:
Put down the vapor barrier/padding. It was super easy to cut, and I used my clear quilting ruler to get straight lines. I attached the pieces with specific tape for it. Side note: this tape has a mirror-like quality, and I felt like I was on Zenon Girl Of The 21st Century using it.

2. Starting in the far left corner, lay out and attach the pieces of flooring, cutting when necessary. These are "click-lock" style laminate pieces and didn't go together as well as a previous one we've tried. This one was pretty in-expensive and it showed when it came time to attaching.
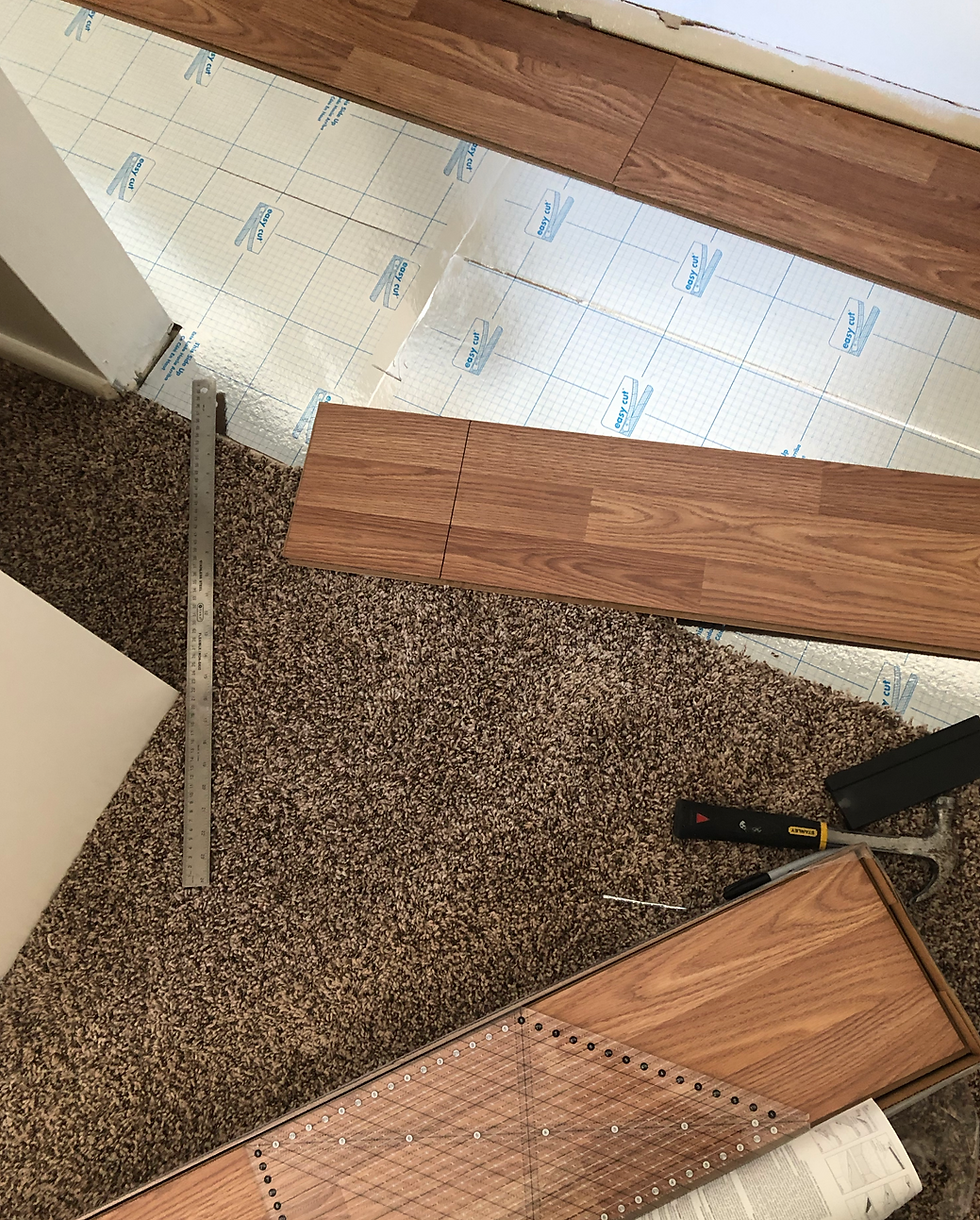
That's it. Super simple, and I felt so dang accomplished when I was done. Was it perfect? No, I'd like a couple parts to attach more snuggly. I think that was more of a material defect because I tried really hard, and it's still just the best it could.
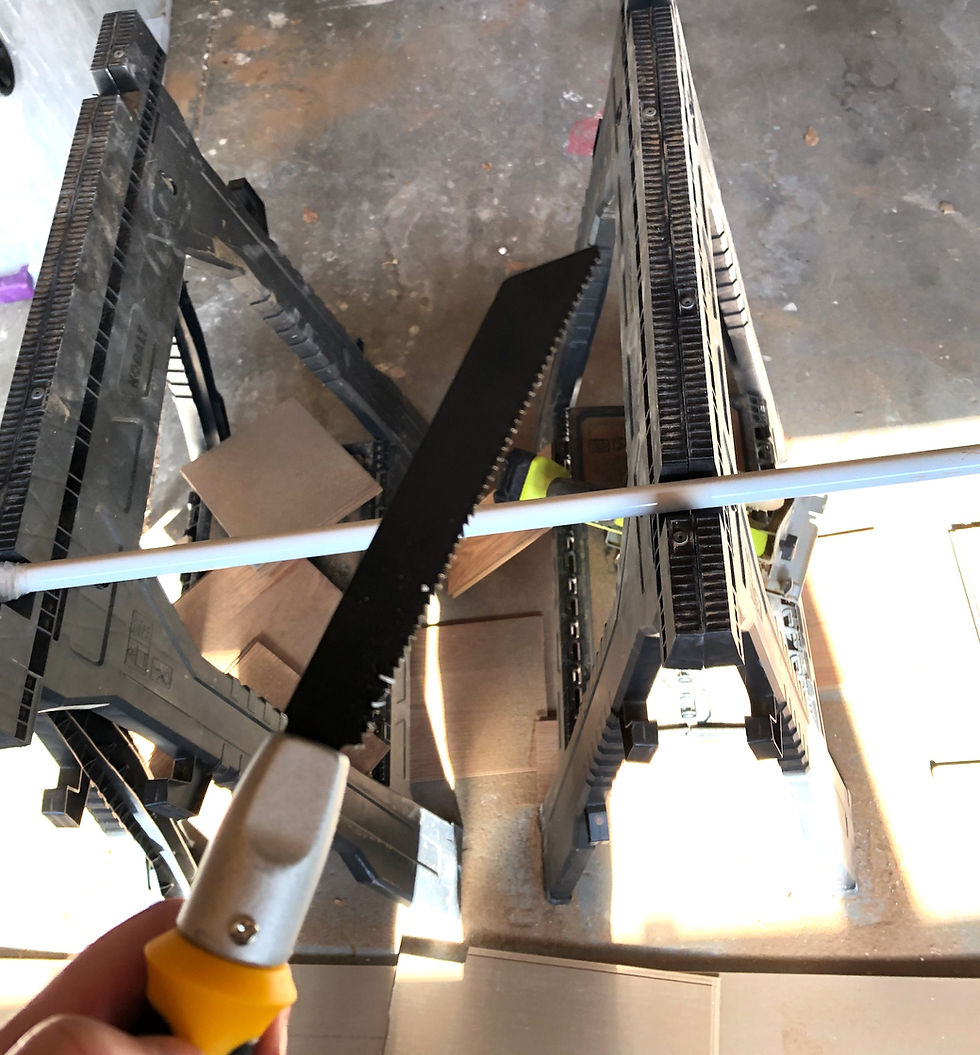
Phase Five: Shelving
The pre-made IKEA shelving was super simple to pop into place and attach to the walls.
I had to run to the hardware store to pick up some rods, shelf pieces to go above those rods, and trim to finish it out.
Although there are probably easier ways to do it, I cut the rods by hand with this little saw:
For the most part, this went super well. BUT I'm not going to lie or try and hide it, I did mess up a section. For the track shelving, I was off on the right hand track by about 1/4" so the shelves were not level. Instead of taking it down and adjusting it, I decided to put some foam padding between the brackets and the shelves to level it out. I did this because I wanted to see if I even liked the shelves in that spot first. That section was the only one I was debating about what would go there- shelves or another rod.

Phase Six: Trim
Next, it was time to do the trim. I did the trim after the shelves because it would've made the shelves stick out from the wall, and why make more work for yourself when you don't need to?
By this point, I just wanted this project to be done. I asked Drew if he'd just do the trim for me, since he's normally the one that does it, and it felt out of my comfort zone.
He kept saying, "no, you've made it this far by yourself, you can do this."
He had a point, but still... He did end up compromising with me and agreed to stand with me while I did it to make sure I was doing it right. This helped a ton. Sometimes, you just need someone to stand next to you and cheer you on while you venture into uncharted territories.
I only trimmed the actual closet area since the carpet in the bedroom would eventually need to be swapped out anyway, along with the trim.
Caulking was an intimidating one for me. I've tried it in the past and made a royal mess of it, but this time it went super well.

Painting the trim went super quick, and I did two coats.
Overall
This was a larger project than I initially thought, and I had to push myself past a lot of discomfort to learn new skills. There were countless times where I'd look around and think, "What the F did I get myself into? I can't do this" But I did. I made this happen. I built a closet system that I'm very happy with and I can fit everything in one place. I barely purged anything when moving it into the closet. (I'll do a post later about the organization of it, but I need to get some other projects done first)
Are there things I'd do differently? Yeah, but it's mostly execution, and that comes with practice. I think a closet was a great place to test out some shelf design skills because it's a closet, and likely not in the public eye for long.
I'll eventually do the doors later, but I have some figuring out on exactly what I want, and how I want to execute it, so for now, it's all open.
BEFORE:

AFTER:


Comments